HTTPS at home. A tale of docker + ARM cross compilation
jcbellido November 11, 2022 [Code] #LillaOst #Rust #Docker #cross compileOne morning, I realized "the obvious"
| the obvious |
|---|
https://your-service.your.net is superior to http://192.168.77.56:5678 |
Instead of exposing services through IP:port pairs, what about human friendly URLs behind HTTPS? GENIUS!
How difficult could that be? What do we need? A local DNS server? Perhaps some certification-thingy that can crunch long numbers? That has to be trivial. We have docker and podman. We have beefy SOCs. Linux in every flavor. We're standing on the shoulders of giants!
🤡
TL; DR
My goal is to use a RaspberryPi 4 as an app server with CA signed HTTPS. I want to be able to configure the services through GUIs and run as much as the infrastructure on docker as I can.
Since my private services are written in rust and the compilation times on RP4 are getting longer, I'm introducing cross compilation. I'll keep the artifacts in a local docker registry.
The components of the solution described in this article are:
| Component | Function |
|---|---|
| An owned DNS | needed for wildcard certificates |
| Pi-hole | as a local DNS server |
| nginx proxy manager | HTTPS reverse proxy |
| docker registry UI | store cross compiled artifacts |
| let's encrypt | certification authority |
| Alpine containers | Our cross compiled artifacts, running |
This might look like a lot but we're quite lucky. Docker and the community has trivialized the setup process. All can be run and tested through docker.
I'm sure there are other ways to achieve similar results. Probably better ways. Check with your friendly neighborhood IT peoples, they're nice and they miss you. You only call them when you get in trouble.
local DNS: Pi-hole
One day, months ago, "the algorithm" blessed me with a recommendation about Pi-hole
Linus Tech Tips! Long time no see! I remember the guy when he was like, 17?, many moons ago, the Internet was young then.
The concept was interesting, a DNS sink hole, what an elegant solution. Since I had a Raspberry Pi 2 lying around, doing absolutely nothing I just followed Linus' steps. As simple as in the video.
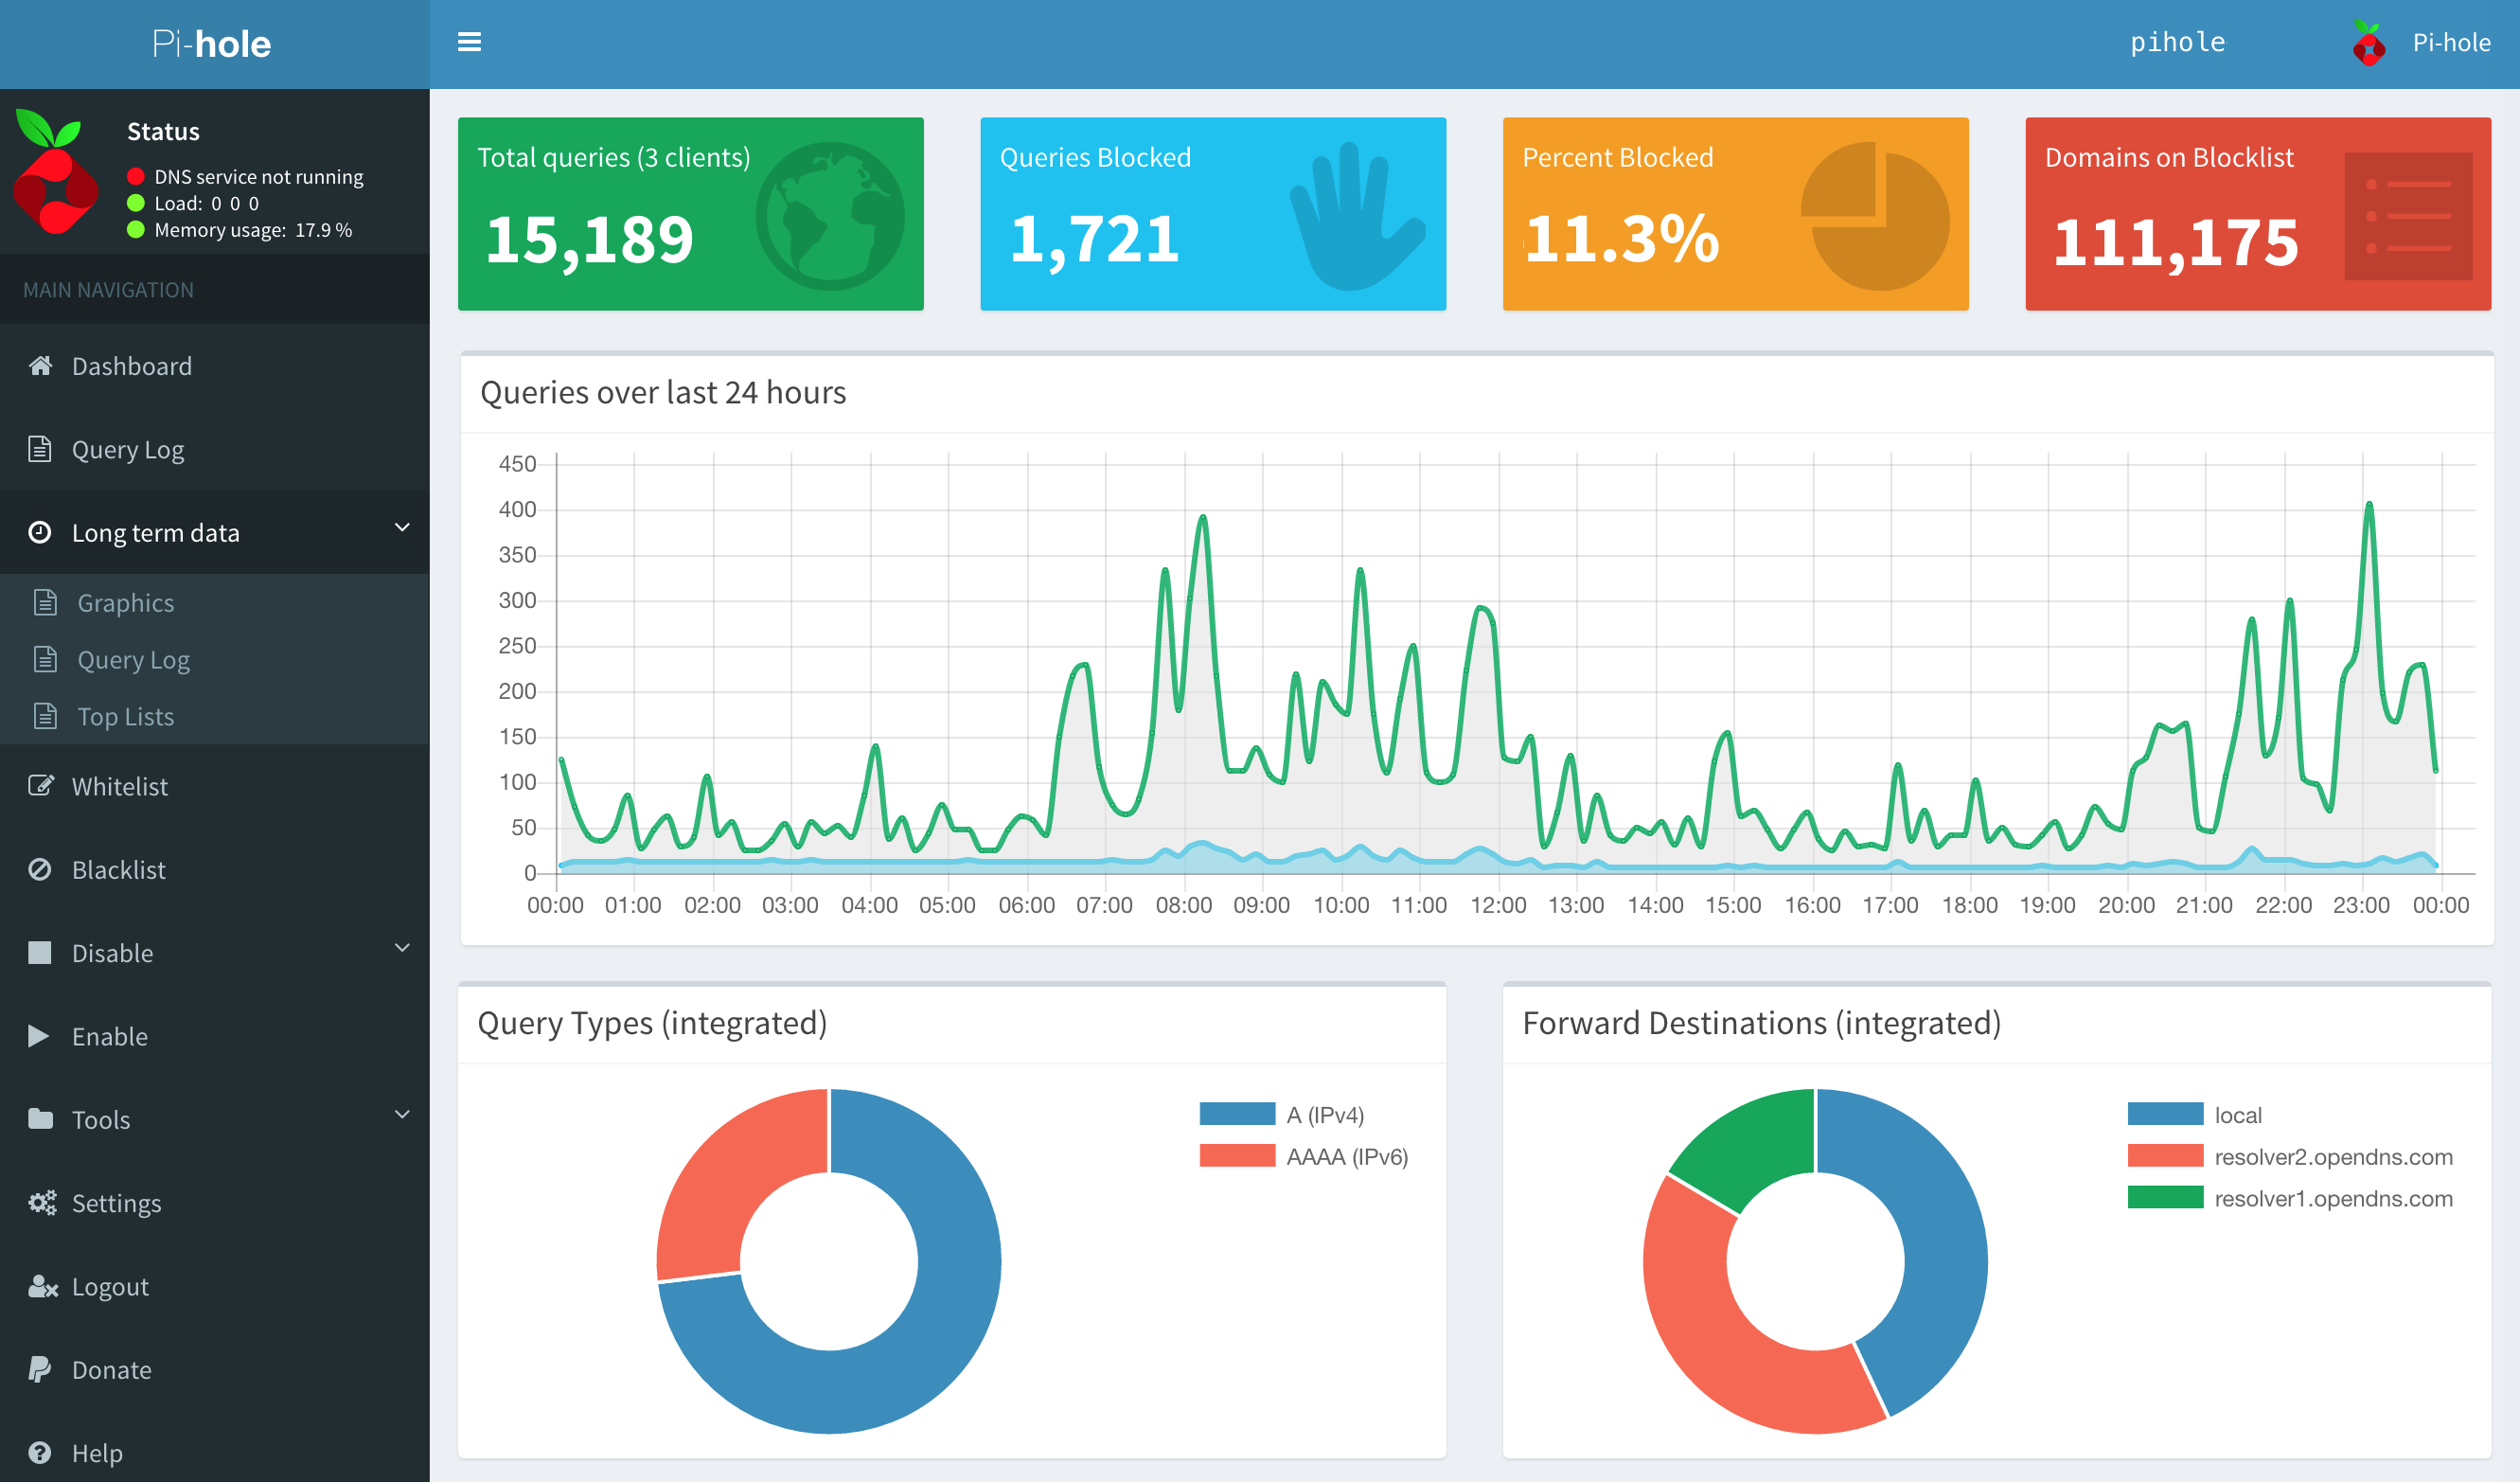
During the months this service has been running, I've been able to detect and fix several network issues, mostly with phone-apps-gone-rogue. Just the dashboard (see image below) gives you a ton of insight into your network in exchange for very little configuration, maintenance and hardware.
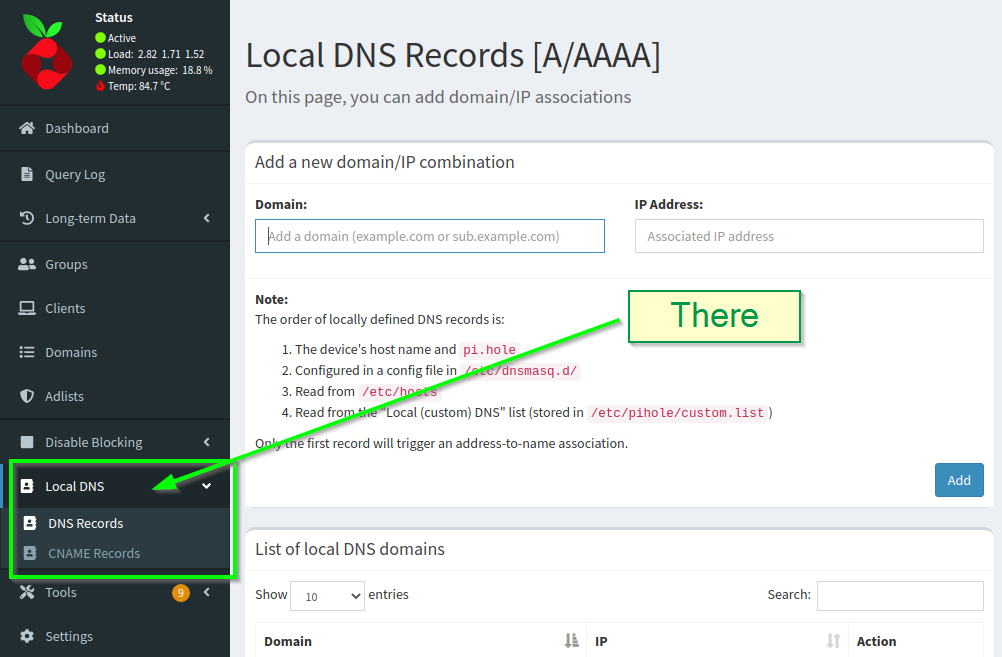
It's quite a capable beast. In this article we're going to use the local DNS feature:
Let's talk HTTPS for a moment
I had the DNS part of the issue solved. Just HTTPS to implement and I could return to my programmery stuff and be merry. So what if we just "turn on TLS" from the backend? Let's say that we want to use axum. We're lucky, there's a ready to use axum TLS server at hand. Seems simple enough:
- Switch the base
axumfortls_axum. Openssl -create -foo -barwill create certificates and we can copy them somewhere reachable by the server.- Add a local DNS in Pi-hole and, in a browser, open https://local-service-name.your.net:5678
- Profit?

By adding a new local DNS entry we improve the situation a bit. A name it's easier to remember than an IP. But we still have the "port" there. Also, let me remind you that my plan is to serve from a single machine. We might have a handful of ports to keep track of.
With this approach we're becoming a cert authority. No browser will trust our certs, not without a lot of convincing. On desktop this convincing might be tolerable. In my case, I'm exposing services designed to be accessed through phones and that can be annoying to configure. Seems as if we would benefit from having proper certificates? Like, signed by a proper CA.
This was getting hairy, seems as if we're taking care of a lot of details here. This seems like a job for a HTTPS Reverse Proxy A little bit of configuration and we should be fine, back in the land of compilers.
HTTPS reverse proxy
As you surely know, nginx is quite an ops-y thing. In other words, it does a lot, it's been around since for ever. It's a complex software. In my context, I just want to put a reverse proxy in front of my services but I'd like to avoid the management aspect of it as much as possible. Christian Lempa has a suggestion for us:
In his video Lempa uses a DNS registry that he owns. Which, BTW, seems to be the essential condition to use let's encrypt 's services. In his video he mentions something interesting: wildcard certificates:
And that's even more interesting. A certificate that's valid for full subdomains, in other words, a "magic thingy" that covers every valid URL under: *.foo.your.net. Talking with build engs and IT peeps around me, all of them coincided in a couple details:
- Wildcard certificates are an hard no-go in production environments.
- For a domestic network, covering private very dev-y services, wildcards are in the OK-ish range.
So there I went and I dropped some moneys in my very own lillaost.com! If you click the link you'll read a mention to DigitalOcean, what about that?.
Lempa's piece, linked above, explains it better but very summarized: it's possible to delegate the management of a DNS to a 3rd party. This is useful when dealing with the details of let's encrypt if you want to work with wildcard certificates. I don't want to put too much effort into the day to day operation of this registry. Delegating the DNS handling to DigitalOcean seemed like an easy way to put things in motion with a relatively low cost.
| In summary, this is the plan |
|---|
HTTPS reverse proxy + Local DNS + wildcard certificate |
Adding nginx proxy manager to the mix
Once nginx proxy manager "was in the radar" the installation was simple. A very compact docker-compose.yml will do the trick:
 version: '3'
services:
  app:
    image: 'jc21/nginx-proxy-manager:latest'
    restart: unless-stopped
    ports:
      - '80:80'
      - '81:81'
      - '443:443'
    volumes:
      - /path/nginx-proxy-manager/data:/data
      - /path/nginx-proxy-manager/letsencrypt:/etc/letsencrypt
Lempa's material guide you through the configuration steps. Go give the guy a thumbs up. He's entertaining and informative.
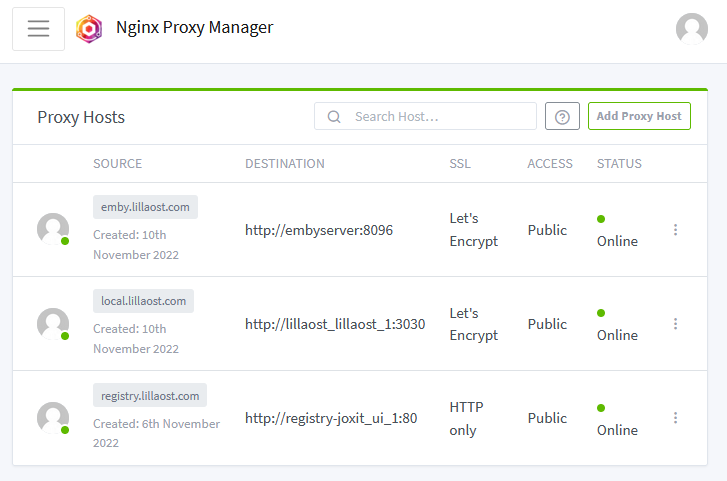
And there's a bit of a subtlety here. How do containers talk to each other? They're supposed to be exceptionally well isolated. You need to do all those explicit open ports and mounting paths. In retrospect is somewhat obvious, let's use a shared docker network. We'll see network entries in the following docker configurations
By using this "network" we can configure the Proxy Hosts like:
Docker based rust cross-compile for RP4
Perhaps you're of the opinion that rust compile times are painfully slow maybe you're right. Who knows?
What I can confirm is that if the compilation time in your blazingly fast threadripper makes you anxious, for your own good, don't try to compile the same project on a Raspberry Pi 4.
Let's use my glorified baby poop tracker, lillaOst, as an example. This project has 2 parts:
and both parts require nightly for reasons too boring to get into right now.
Talking from memory the backend part takes around 30 minutes to compile in RP4. I've never been able to compile the frontend part in the Raspberry Pi (I haven't tried too hard either)
But what if we could compile somewhere else and just run an image of the artifact in the Pi using docker? Let's cross compile this beast.
Cross compiling binaries
Rust supports cross compilation in a bunch of different target platforms. One of my first steps was to try to use cross. It has the approach I wanted to take: docker based transcompilation environment. And it works. This is 👨🍳!
But since this was my first rodeo, I wanted to follow a more hands-on approach. There's quite a lot of folks out there targetting ARM devices. I found many articles with quite detail and deep information, to cite just two:
- modio has a very interesting article combined with an cross compile example repo.
- kerkour material is also pretty good.
My project is relatively simple so we can do something like this:
 FROM rust:1.64 as builder

RUN apt-get update
RUN apt-get -y install binutils-arm-linux-gnueabihf

RUN rustup install nightly && rustup default nightly
RUN rustup target add armv7-unknown-linux-musleabihf

# Let's setup the workspace
WORKDIR /build

RUN cargo new backend && \
    cargo new utils

COPY ./Cargo.toml ./Cargo.toml
COPY .cargo ./.cargo # << this is funny

COPY ./backend/Cargo.toml ./backend/Cargo.toml
COPY ./utils/Cargo.toml ./utils/Cargo.toml

# Download and build the dependencies
RUN cargo build --release --target armv7-unknown-linux-musleabihf

# Bring the code and build again
COPY ./backend/ ./backend/
COPY ./utils/ ./utils/

WORKDIR /build/backend

RUN cargo build --release --target armv7-unknown-linux-musleabihf
There's an interesting detail in the .dockerfile above, that little COPY .cargo ./.cargo it was the first time I saw one. That's a .cargo folder at the root of my workspace that contains a single config file. Mine looks like this:
[] [] = "arm-linux-gnueabihf-ld"
In any case, if everything goes all righty, you should have a very reasonably sized musl libc binary.
Cross compiling WASM
To state the obvious, unless you're doing something funny, anytime you build a WebAssembly artifact you're effectively "cross compiling". The issue for me wasn't only the compile time but the difficulties I had when trying to compile the frontend with trunk. In plain terms, it has never worked ... for me.
We can follow the same general structure than above, with the difference that here we're installing wasm32 as a target and the trunk building tool:
 FROM rust:1.64 as wasm-builder

RUN rustup install nightly && rustup default nightly
RUN rustup target add wasm32-unknown-unknown

# Some workspace setup
WORKDIR /build

RUN cargo new utils && \
    cargo new frontend

COPY ./Cargo.toml ./Cargo.toml

COPY ./utils/Cargo.toml ./utils/Cargo.toml
COPY ./frontend/Cargo.toml ./frontend/Cargo.toml

RUN cargo build --release

# Let's bring trunk
RUN cargo install --locked trunk

COPY ./frontend/ ./frontend/
COPY ./utils/ ./utils/

WORKDIR /build/frontend
RUN trunk -v build --release
This will generate both the static assets and the wasm used by the application. This topic reducing wasm binary sizes also deserves attention. Building stuff is complex stuff, y'all.
Executing container
At this point we have both the backend and the frontend built. It's time to join them in a "runnable" container. Let's bring the minimal alpine linux:
 FROM arm64v8/alpine

ARG APP=/usr/src/app

EXPOSE 3030

WORKDIR ${APP}

# note the target in the path: `armv7-unknown-linux-musleabihf`
COPY --from=builder /build/target/armv7-unknown-linux-musleabihf/release/production-server ./bin/production-server

# bring the wasm from the frontend builder
COPY --from=wasm-builder /build/frontend/dist/ ./frontend/

WORKDIR ${APP}/bin
CMD [ "./production-server" ]
that binds everything together in a reasonable 7MB compressed image:
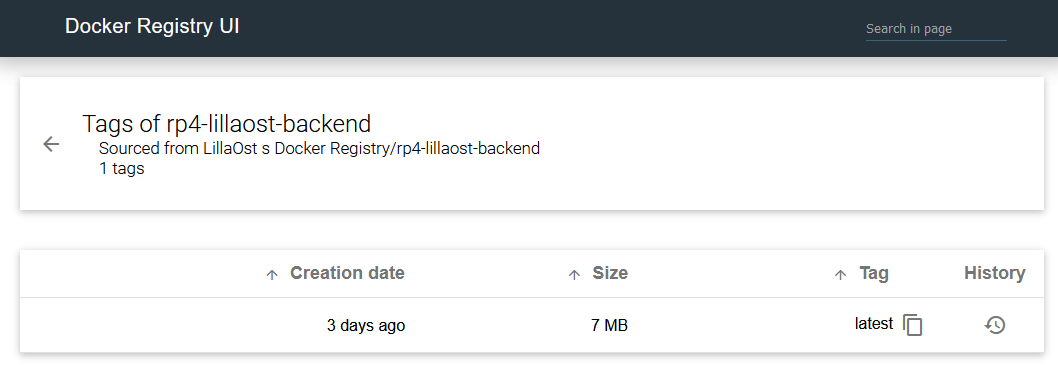
| But wait, what's that? |
|---|
| Well, at some point I realized that I didn't want to send my images to dockerhub. Once nginx is in place and adding new services is easy, why not a local registry? |
Local docker image repository
I must confess that at this point I was a bit drunk with power. I had a very simple way to add new services, give them names and start running after a minimal configuration. That's what docker can do to you, turn you into a digital expansionist.
There's a bunch of details that I didn't know about. I was vaguely aware that dockerhub was a thing. I have some memories of using it while working at DICE. What I didn't knew is that it's possible to run your own registry and that there are projects out there that slap basic but functional UI on top of it like docker registry UI.
My goal here was to have the simplest registry. All this work is about convenience more than iron clad security in my network. So let's say that we want a HTTP access to the registry and for it to save the files to a local folder somewhere in your server. We could start with this docker-compose.yml
 version: '2.0'
services:
  registry:
    image: registry:2.7
    restart: unless-stopped
    ports:
      - 5000:5000
    volumes:
      - /path/to/your/library:/var/lib/registry
      - ./your-simple-configuration.yml:/etc/docker/registry/config.yml
  ui:
    image: joxit/docker-registry-ui:latest
    restart: unless-stopped
    environment:
      - REGISTRY_TITLE=Fancy title of your registry
      - REGISTRY_URL=http://registry.lillaost.com:5000
      - SINGLE_REGISTRY=true
    depends_on:
      - registry

networks:
  default:
    name: nginx-proxy-manager_default
    external: true
And for the registry configuration itself something like this could work.
version: 0.1 log: fields: service: registry storage: delete: enabled: true cache: blobdescriptor: inmemory filesystem: rootdirectory: /var/lib/registry http: addr: :5000 headers: X-Content-Type-Options: Access-Control-Allow-Origin: Access-Control-Allow-Methods: Access-Control-Allow-Headers: Access-Control-Max-Age: Access-Control-Allow-Credentials: Access-Control-Expose-Headers:
At this point we should have a working:
- Local DNS
- HTTPS reverse proxy
- Local docker registry
- A runnable container
We're missing the service itself!
Running the service
In the section above there's a reference to docker network we're going to use it to make the service we want to run "visible to the proxy". This is the docker-compose.yml I'm using:
 services:
  lillaost:
    image: registry.lillaost.com:5000/rp4-lillaost-backend:latest
    restart: unless-stopped
    volumes:
      - type: bind
        source: /path/to/your/static/files
        target: /usr/src/app/static
      - type: bind
        source: /path/to/your/app/data
        target: /usr/src/app/bin/data
networks:
  default:
    name: nginx-proxy-manager_default
    external: true
Again, I'm not at expert at this but at high level the idea is:
- Pull the image from the registry.
- The
restartfield informs docker that you want this running on restart. Unless you kill-it-by-hand. - Attach the container to the existing
nginx-proxy-manager_default
From this point the rest of the configuration is pretty straight forward:
- Add an entry to it in Pi-hole, let's say
local.lillaost.com - Add the proxy rules in
nginx proxy managersomething like this:
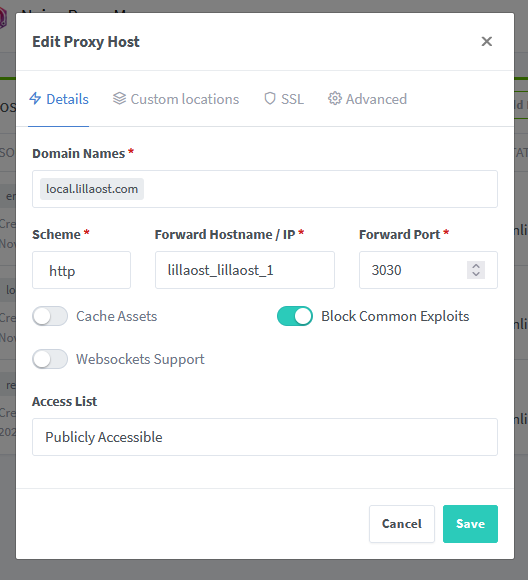
and the SSL configuration
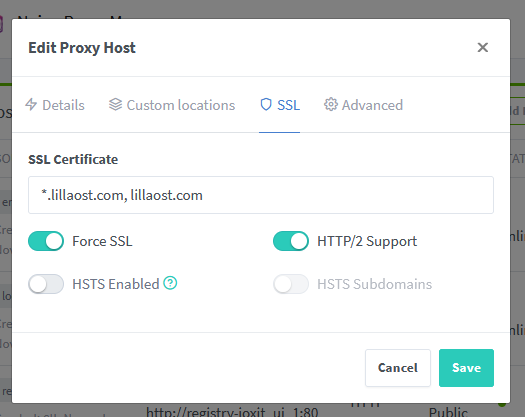
Closing for now
In the programmery lands is sometimes easy to forget that IT is a thing. That containerization is a thing. That's sad. There are fantastic projects out there, ready to use, one .yml away.
If anything else I hope this piece helps me remember that from time to time it's easier to install a service than "do everything by hand".
